
Welcome to the definitive step-by-step guide to setting up a Google Ads campaign like a seasoned professional. In the competitive landscape of digital marketing, mastering the intricacies of Google Ads can be the difference between success and stagnation. Whether you’re a newcomer eager to launch your first campaign or a seasoned marketer looking to refine your strategy, this comprehensive guide is designed to equip you with the knowledge and expertise to navigate the complexities of Google Ads with confidence. Join us as we unravel the essential steps and insider tips to help you create, optimize, and maximize the impact of your Google Ads campaigns.
- Beginner’s Guide to Google Ads
- 20 Basic Steps to Start a Google AdWords PPC
- Google AdWords Tutorial: A Step-by-Step Guide to Your First Campaign
- Google AdWords | The Complete Guide To Take You From Zero To Hero
- A Crash Course In Google AdWords for Bloggers
- The A – Z Of Google Ads
A Crash Course of Google AdWords Campaign Setup
So finally you have decided to opt Google Ads, a very useful marketing tool to boost your business reach. If you are still confused, you can decide by reading this blog for Google Ads Campaign Setup.
I hope, it’s your final decision to go with Google Ads Campaign Setup, paid advertising tools. I have created this guide to easily teach the persons even if they are zero in Google Ads. and it’s my hard believe that this effort is not going in vain to share the steps and tips. So before starting, would love to hear your words in the comment box below, to stay motivated for sharing the knowledge.
What is Google Advertising?
Step-by-Step Guide to Your First Campaign Setup
1. Login to Google Ads
First, you need to create a google account to begin.
So, go to ads.google.com and follow the instructions to complete the account creation.
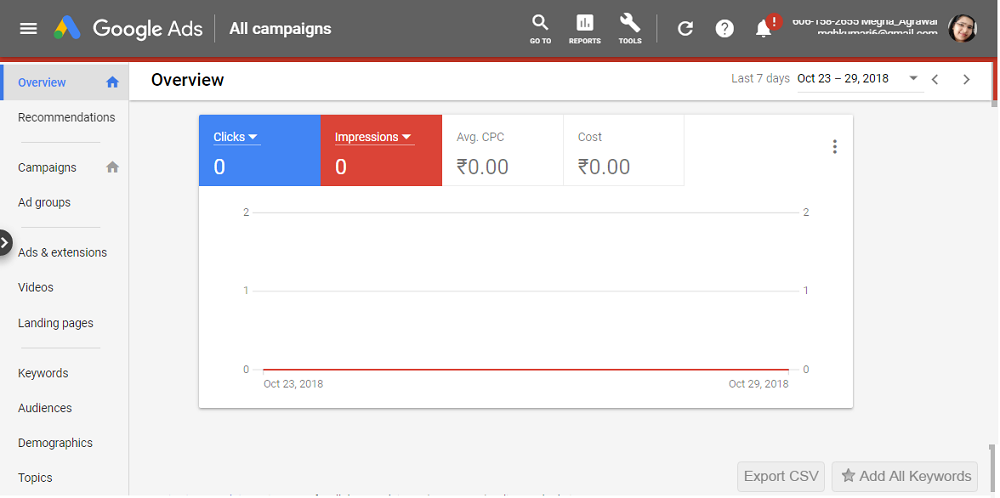
2. Google Ads Dashboard
Later on login, you will land to Google Ads dashboard. Here you can see the overview of your all campaigns.
3. Add a New Campaign
Now navigate to campaign & click on the + icon to create a new campaign. Tap on “New Campaign” after the + icon.

4. Campaign Types
You will get the following options to choose as a campaign type during the process of Google Ads Campaign Setup:-

Choose the “Search” option to create a Google campaign for Search Ad.
You can read here the differences between these all campaign types and then select accordingly.
5. Select Your Goal
After Choosing campaign type, you need to select your goal. The goal means the purpose for which you want to run your ads.

Sales: Choose this option if you want to sell something on your website. Generally, it’s used for services and products.

Leads: If you want the customer details to approach them for your business, then choose leads as your goal for the search campaign. It will ask the user to fill your contact form.

Website Traffic: If you are running some offers and want to take attention of users to see the information you have added on site or you have planned similar to this, then go with Website Traffic goal. It will help you to earn huge traffic on your site.

I suppose you have chosen a goal and ready to move forward.
Here, I have chosen Leads as an example and chosen website visit as the way to reach the selected goal. You can choose other options from Phone calls, Store Visits & App Download. After opting it, simply pressed CONTINUE.

6. Rename Your Campaign
Now give a campaign name. For easy understanding and remember, you can write something which will easier to segregate multiple campaigns. For e.g., If you are going to run your ads in multiple countries, state or products, then mention the main thing in Campaign Name. Be sure, It is just for your reference not for the public.
Also, uncheck the “Search Network Partners” & “Display Network” if you have a limited budget or you don’t want to show your ads everywhere.

7. Schedule Campaign
Click on Show more Settings and navigate to “Start and end dates”. Here you can choose the dates on which you want to run the campaign & automatically it will be applied.
It mostly used when you are going on a vacation or any tour with limited access to internet. You can skip this setting if you are not going away to your system for longer days.

8. Targeting and Audiences
If you want to target the entire nation of your location you can directly choose it else customize it by adding the selected cities or states you want to target.
It’s recommended to add locations manually to get better outputs and for doing experiments.

9. Audiences
Under Locations Option, always choose “People in your targeted locations” to prevent unwanted clicks & ruining the budget if you are providing your services locally. Else you can target those audiences as well if they are not inside your circle but are interested in your business.
10. Budget
Add the budget you want to spend every day.
If you have a monthly budget then divide it by 30.4 to get the daily budget
E.g. Rs.15000 is my monthly budget then I will divide it by 30.4
I.e. 15000/30.4 = 493.42
So my daily budget would be Rs. 493.42
Choose Standard as your delivery method always.
The Accelerated delivery method spend your budget drastically by showing your advertisements wherever possible
Top 5 Reasons to Choose Accelerated Delivery Method in Google Ads
- There are very fewer searches of your business
- No budget limitations
- Less search volume keywords
- Your business is new in the online market
- Running any offers or sale for a short time or on any occasions

11. Bidding
When you are creating a new campaign, always start with manual CPC (Cost Per Click) and uncheck the button of Enhanced CPC given below.
Reason being, it will help you to make decisions later on in managing your budget and optimizing your campaigns in possible lowest CPC.

12. Ad Schedule
Generally, we used to skip this setting for running the ads whole day automatically. But if you have some special offers for selected days and timings then definitely you can customize the settings as per your requirements.

13. Ad Rotation
Follow Google recommendations to optimize your ads to perform better. Else, choose the other option as per your goal

14. Ad Extensions
Extensions are used to maximise your CTR (Click Through Rate) and conversions by up to 15% because it allows you to show some additional information apart from your ad copies.
10 Ad Extensions Inside Google Ads Campaign:
- Sitelink Extension
- Callout Extension
- Structure Snippet Extension
- Call Extension
- Message Extension
- Location Extension
- Affiliate Location Extension
- Price Extension
- App Extension
- Promotion Extension
You can use one or multiple of these extensions as per your business requirements. You can add the extensions from here skip now for adding it later on and then click on “Save and Continue” toward finishing your campaign settings.

15. Google Ads AdGroup Setup
Now you will be landed to Setup Ad Group Section

16. AdGroup Setup
Rename your AdGroup in such a way which should be helpful for you to understand the details inside that.
Top 5 Tips to Rename Your Ad Groups in Google Ads
- Web writer – India: Go to Keyword Planner and look for Keyword Ideas. Pick the Group name & addon it with location or Keywords Match Type

- Web Writer – Exact Match: Go to Keyword Planner and look for Keyword Ideas. Pick the Group name & add the name of Keywords Match Type here
- Article Writing – Blogs: Combine your services with the subcategories of the same
- Content Writing – Flat 50 Paise: Rename your AdGroup Name by putting your services along with some special offers or limited time discounts
- Google Ads Free Audit: Likewise, you can rename your AdGroup followed by your different-different services.

17. Create Ads
After finishing Campaign & Ad Group Settings, let’s proceed to create Ads to complete the campaign. Or you can skip the step here and save and continue to create the ad copies later.

How to Create an Impressive Ad Copy?
Before starting to create the ad copies, keep in mind to maintain a good keyword relevancy along with some features & a better call to actions.
Final URL:
Add the URL to whom the user should be landed. The maximum limit is 1024 characters for adding the Final URL.

Headline 1 & 2:
You are allowed to create headlines under 30 characters each. Keep it simple and understood in a few words. You have an option to add more than 2 headlines which can be created to show your ads by shuffling the headlines.

Display Path:
Each path have maximum of 15 characters to put some more relevant terms. A better practice is to add the categories and subcateries here. Or Add the product and locations if you are going to run your campaigns for multiple cities.

Description 1 & 2:
Each of these has limitations of 90 characters which has been provided you to put a bit more details about the services or products you are going to advertise.
The best practice is to add some USP’s (Unique Sales Point) & show some authenticity to impress the audience easily to click your ads.

18. Congrats! for Google Ads Campaign Setup
You have completed all the basic steps so far. Now click Save And Continue to review the settings to go to the next step.

19. Continue to Campaign
Cross check all of your campaign setups & make it live by clicking on “Continue to Campaign”.

20. Edit in Your Existing Campaigns
To make any further changes in this created campaign, go to Google Adwords Dashboard and select the campaign you want to make changes in. It’s all setup will be opened in the next window. Now navigate to the required section and make the changes whatever you want.

As you conclude this step-by-step guide to setting up a Google Ads campaign, you’ve embarked on a journey toward mastering one of the most powerful tools in digital marketing. By following the meticulously crafted steps and leveraging the pro tips shared throughout this guide, you’ve gained the foundational knowledge and expertise to launch and optimize successful Google Ads campaigns like a true professional. Remember, success in Google Ads is not just about mastering the mechanics of the platform but also about continuously testing, optimizing, and refining your strategy to stay ahead of the competition. Armed with this guide, you’re poised to achieve your marketing goals and drive exceptional results in the ever-evolving landscape of online advertising.

Pingback: Trello - The best Tool to Manage Your Google AdWords or PPC Tasks